My Git Workflow

One thing I’ve learned as a developer is that everyone has a slightly different git workflow. Mine is pretty simple, rarely uses anything beyond the basics (other than rebase), so, if you are an early career developer, consider trying it on for size. Let’s get started!

I’ve just grabbed a ticket, so I’m ready to get started. First things first: I need to create a new branch off main.

git checkout -b my-awesome-branch

Now that I’m on my branch, I can start making changes. I will make one small change and create a new file. Now I’m ready to commit! But first, I must validate that the changes I’m committing are precisely what I want. You might think, “Jennifer, I just made these changes; why do I need to recheck it?” While it might seem silly, you will be surprised by the changes creeping into your commits if you aren’t careful. One really common one is dependency updates. So first: we will do a git status and a git diff.

command prompt showing the results of git status -s

You’ll notice that I didn’t just do git status but git status -s. The -s is for “short” and I prefer that because it gives me all the information I need in a nice compact manner. The M says that a file is modified and the ? means that it’s a new, untracked file. Next, I want to do git diff which will pop up a window (by default using vim) that looks something like this:

output of git diff

It shows that I added one new line in README.md. You’ll notice that nothing will show up for the untracked file! Now that I’m confident that my changes are what I want them to be, I’m going to do git add -A and then run git status -s again (which I have mapped to git s).

output of git add -A and git s

Time for a commit! If I have a longer commit message that I want to write, I will do a full git commit. More often, I will just use git commit -m to do it all in one line.

output from `git commit -m "extremely necessary hello_world script"`

Now, time to push it up.

output from git push

That might be all. However, like many developers, I often realize I have made a mistake. I like to pretend my mistakes never happened! Some people will just make a brand new commit with a message like “fixing typo”. Me? I pretend my typos never happened by making my changes, adding the file, then doing git commit —-amend.

git status -s, git diff, git add, git status -s, and git commit --amend

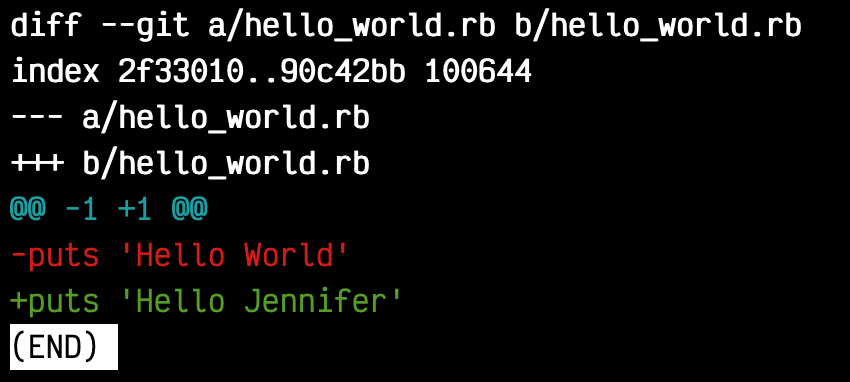
There are a couple of spots in this where I couldn’t get it all in one. So here’s the git diff that happened at the 9:34 timestamp:

git diff

Clearly I realized that I didn’t actually want “World” but for some reason wanted my name instead. After I added the file, this is what pops up when I do git commit -—amend:

output from git commit --amend

As you might be able to tell, I could also edit my commit message here! I also use amend if I have made a typo in a commit message or if I just want to expand on my initial, too short message. After amending (or rebasing), you will have to do a git push -f or a “force push”. Why? Because you are effectively rewriting git history!

git push -f

IMPORTANT NOTE if you are working on the same branch as someone else, be careful about force pushing. Consider using git push —-force-with-lease instead. And always make sure to let your buddy know that you are doing this.

That’s pretty much it! It might seem like a lot, but it actually gets pretty quick pretty fast as muscle memory kicks in. If you are interested in some shortcuts, here’s an example of what my .gitconfig sometimes looks like.

What’s your git workflow? Is there something you think I should change? Let me know!

Autofixing Variable Case In PHP

I’m currently working on a PHP project that had a mix of camelCase and snake_case for variables and methods. We had recently started using PHP-CS-Fixer on the project and, unfortunately, there was not an existing rule to make this kind of change. So I decided to write a variable case fixer myself! Now: this is inherently risky. Instance variables in PHP are called using $this->variableName, which is really similar to how you call a function. Those could also be defined above the constructor like private $variableName and that would be fixed with a fixer like this, but any call site would not. So there’s some of the risk 😅. There are also predefined variables in PHP that we would not want to update. Ok, let’s get started!

Since I was using an existing project, I did not have to worry about getting each file and was able to trust PHP-CS-Fixer to parse each file and get me the tokens. The hardest part of this was actually figuring out how to pick out the tokens. So all this does is check to see if the token (smallest block of code) is either of the two variable types and not in the list of predefined variables.

foreach ($tokens as $index => $token) {
  if ((T_VARIABLE === $token->getId()) || (T_STRING_VARNAME === $token->getId())) {
    if (in_array($token->getContent(), $predefinedVariables)) {
      continue;
    }
    $tokens[$index] = new Token([$token->getId(), $this->updateVariableCasing($token->getContent())]);
  }
}

That is actually the bulk of it! updateVariableCasing just takes the configuration and then calls whatever function we need (ie camelCase if configuration['case'] is equal to camel_case. The functions to change case were found somewhere on StackOverflow. Overall, this works very well! The only places we ran into problems were where private variables were defined at the top, converted there, but then not converted when called in the code (as $this->variable_name). Something to keep in mind if you decide to implement something like this in your project.

I did put up a PR to add this rule to PHP-CS-Fixer, but I think they were reluctant to add it since it’s not safe and I don’t have a ton of extra time to keep trying to get it in.

Learning Rust with a Java Background

Last year, I volunteered with TEALS, working with a local teacher once a month who was teaching the AP CS class. There was some extra time at the end of the year, so my teacher requested that I put together some materials to teach the kids something new. Since I was teaching myself Rust at the time, I decided to write a guide specifically aimed at high school students who have learned some Java but are now interested in Rust. I was heavily inspired by the Rust Book, but tried to simplify it so you could make it through in about one and a half hours. I’d love feedback on it and I hope someone finds it useful.

Rust Tutorial for AP CS (Java) Students

RailsConf 2018 Recap

I went to RailsConf last week and it was an amazing experience. DHH's keynote reminded me why I love Rails. Eileen's keynote made me super pumped for Rails 6. And all the talks were a delightful reminder of why I love programming and why I love the Ruby community. Here are some deeper thoughts and notes, divided up by talk:

Note: I'll post links to talks that I reference as soon as they are up.

DHH's keynote

This talk really hit home for me since I was very recently battling with Play for 4 months. One of the things that I do really love about Rails is that I can focus on solving the problem I actually want to solve, not problems that have been solved before (like... authentication). And, while I do agree that junior developers and people just starting out should not have to know SQL, I do think that knowledge of SQL is still useful if you want to be a good Rails developer. Relying solely on ActiveRecord is a mistake.

Crash Course in RSpec: stubs and doubles and mocks -- oh my!

This workshop managed to be both good and not quite what I wanted. I had hoped by the title that there would be a big emphasis on stubbing, but it was more of a footnote. It was a good crash course though and if you don't have much prior RSpec experience, check out Nicole's tutorial.

Interviewer Skills

Jennifer Tu of Cohere gave an excellent workshop on interviewer skills that I have about 4 pages of notes from that I will try to sum up here. One of the first things she brought up was that a team should have specific goals in mind when interviewing:

  • What values does the team have?
  • What characteristics does the candidate have?
  • What actions does the candidate take in certain situations?
  • What makes someone successful on my team?

For each attribute that the interviewers want the candidate have, they should ask questions that dig into how a candidate behaves. For example, if your team values kind feedback, instead of asking "Do you give kind feedback?" or "Are you nice when responding to pull requests?", ask "Have you ever given feedback to someone whose code was not good? What did you do? Why?". If you value independent learning, ask:

  • How do you learn something new?
  • Do you have an example of a time when you ran into code you didn't understand?
  • Share a time when you had a problem dumped into your lap but you had no idea what to do.

Make sure to wrap a question in context to ensure the candidate fully understands what you are asking. For example, one of the attendees wanted independent thinkers and people who would question decisions. They were currently asking this question:

You get a user request to add a blue button. How do you add a blue button?

However, in the context of an interview, someone who would normally question a decision like that might resonable think that the interviewer just wants to know if they know how to add a button to a page in HTML. What they should ask is:

We get a lot of feature requests and they aren't always valid. What would you do if you got a feature request to add a blue button?

Allow interviewees to show the skill if you can. Theoretical scenarios often just end up only showing red flags. Play acting is the better option. For example, if you want to know if someone gives kind feedback, give them some bad code and have them review it. If you want to know how they handle conflict, play act with the two interviewers coming up with conflicting ideas and ask them how they would resolve it.

It is the job of the interviewer to give the candidate the opportunity to show off. Interrupt (politely) if needed. You will be doing them a favor! Here are some possible polite interruptions:

  • I like where you are going with this but....
  • I'm sorry to interrupt, but I'm really curious about...
  • This is interesting, but I really want to hear more about...

You should also be sure to set an agenda and share rubrics with other interviewers ahead of time.

Pairing: A Guide To Fruitful Collaboration

André Arko gave this talk on the best way to pair and, as someone who has paired incorrectly for a while, it was quite interesting. So the basis of pairing is two devs, one machine.

Discover & share this Ncis GIF with everyone you know. GIPHY is how you search, share, discover, and create GIFs.

I can't not use this gif even though pairing is not this.

Anyway! You should be actively collaborating. The best way to think of pairing is to think of it as one little meeting. If done right, it should push you to be a better dev and away from bad habits. Above all, pairing needs trust. If you are condescending, that breaks the trust of your pair and makes you a lousy pair. One good way to pair is to have the driver write a test, codes until the test passes, writes a new test, then switch driver to the other person, who then repeats the process. Never say "let me do this quickly by myself." That is not pairing! Help the driver solve the problem and stay on the same page, so you both understand. There's a lot more to this talk, but I think you should watch it yourself 😃

The Practical Guide to Building An Apprenticeship

Megan Tiu built out the apprenticeship program at CallRail and so we get to learn from her experience! To start an apprenticeship program, you need:

  • plan (what are they going to do?)
  • cash (pay them!)
  • buy-in (convince the boss!)

You can sell it by noting that apprenticeship programs:

  • eliminate onboarding costs (you get to teach a newbie developer your way of doing things)
  • eliminate recruiting costs (why pay a recruiter $10K when you can give it to your apprentice)
  • easier to hire seniors (who love to mentor)

Here's what you want to know about your plan:

  • How long will the program be? (suggestion: 3-4 months)
  • How many apprentices do you want to have? (ensure there are enough seniors to mentor them)
  • What should they know prior to starting? (do you expect them to have a basic working knowledge of Rails?)
  • What should they learn?
  • How will they learn it? (through tickets, a big project, pairing, etc)

For hiring your apprentices, you want an application (basic questions to get to the heart of what they are about), a code challenge, and a final interview. If possible, do end-to-end anonymization until they get to the final interview. You also want to ensure you have a rubric prior to starting this process. After you hire them, try giving lessons on foundation concepts, then give them small changes (bugs/internal code). Then rotate them around to different teams, including customer facing product. And don't forget to set early expectations!

Eileen's keynote

Eileen Uchitelle totally pumped me up. She discussed the various ways she is looking to make Rails more scalable by default. One of the things that really stuck with me was when she mentioned how so many companies are doing these things individually... so why not make them part of the overall framework and share the knowledge!

The Code Free Developer Interview

Can you tell I am into interviewing? This was a talk by Pete Holiday, also from CallRail. Here are the problems with coding during interviews:

  • don't replicate real work
  • disadvantage people without free time (code challenges)
  • live coding is very stressful, even for experienced people
  • difficult to develop and maintain a good code challenge
  • many passive candidates won't do the takehome (I've done this before)

So what's the solution? The primary solution is to just talk to candidates.

  • Ask all the candidates a consistent set of questions
  • Define a rubric ahead of time
  • Write down thoughts right after the interview

That's it! But there's more. Here are three possible techniques for a code-free interview:

1. Dig into their experience. Let them direct you to what they feel is most important. Ask questions like:

  • What was your role in the project?
  • How does the feature work?
  • What's the worst technical debt? Why hasn't the team fixed it? How would you fix it?
  • Has it had any bugs/outages in production? What happened? How did the team fix it?

2. Have them do a code review. If you choose this, make sure you are not using production code (they will have no context), are actively reducing complexity, and include realistic bugs without making it a bug hunt. One good option is to have a completely contrived situation with a simple application and a pull request to that simple app. Another is to fork an open source repository and create a contrived PR. The pull request should include no detail in the commit message, unsquashed commits, non-idiomatic code, overly complex, bad variable names, and actual bugs.

3. Try doing a collaborative system design. For this, you want to hypothetically build a tool, platform, or a project. You don't want any code or pseudocode and you should be working with the candidate. The general idea should be easy to understand and either related to the skills you're hiring for or well known. This can be forever-long, so it needs to be timeboxed. Let the candidate lead and build complexity if it's needed. For example:

Let's say we want to build Facebook. Get rid of the boilerplate (we already have users) and then ask "How do we implement status updates?". Once they get there, we can go deeper and ask about privacy controls, then granular privacy controls, and past that potential performance problems.

I loved this talk because I think code-free developer interviews should be the norm and have also been advocating for it at companies that I have been at.

Plays Well With Others: Improv For Nerds

H. Wade Minter gave this workshop and I don't have any notes on it because it was an improv class. But! One of the big things I took from it was our last activity. To remove bias from ideas, we did the following:

  • each wrote down an idea on how to improve RailsConf for next year
  • exchanged that idea with another person
  • each paired up with someone else, compared ideas, and gave each idea a number of points (total points for the two ideas could not be higher than 7)
  • exchanged ideas with a different person
  • wash, rinse, repeat until we have compared ideas 5 times

At that point, we had seen about 10 different ideas (plus our own) and the best idea could have a total score of 35 with the worst having a score of 0. Our top idea had a score of about 26, with a good number being around 22. We had a couple of bad ideas in the double digits (I'm looking at you, bacon table). This definitely seems like a good practice for any organization with a decent number of people.

And that's it...

I did some more, but I don't have any notes! I also sat and watched my friend Sam Phippen pair for an hour and a half, so if you want to learn yourself some RSpec, watch here!

Introduction to Scala

I signed myself up to teach a Scala class through Girl Develop It Pittsburgh a few months ago and the class was supposed to be tomorrow. I say "supposed to" because we only had two people sign up, so we ended up canceling. However, I still made a presentation! And since I spent all that time on a presentation, I decided to make a set of screencasts to accompany that presentation. If you've ever been interested in trying out Scala, I hope this helps. If you need any help or want me to go through some other aspect of Scala, feel free to contact me.

Find the rest of the series here.

The Fuck: The CLI App You Didn't Know You Were Missing

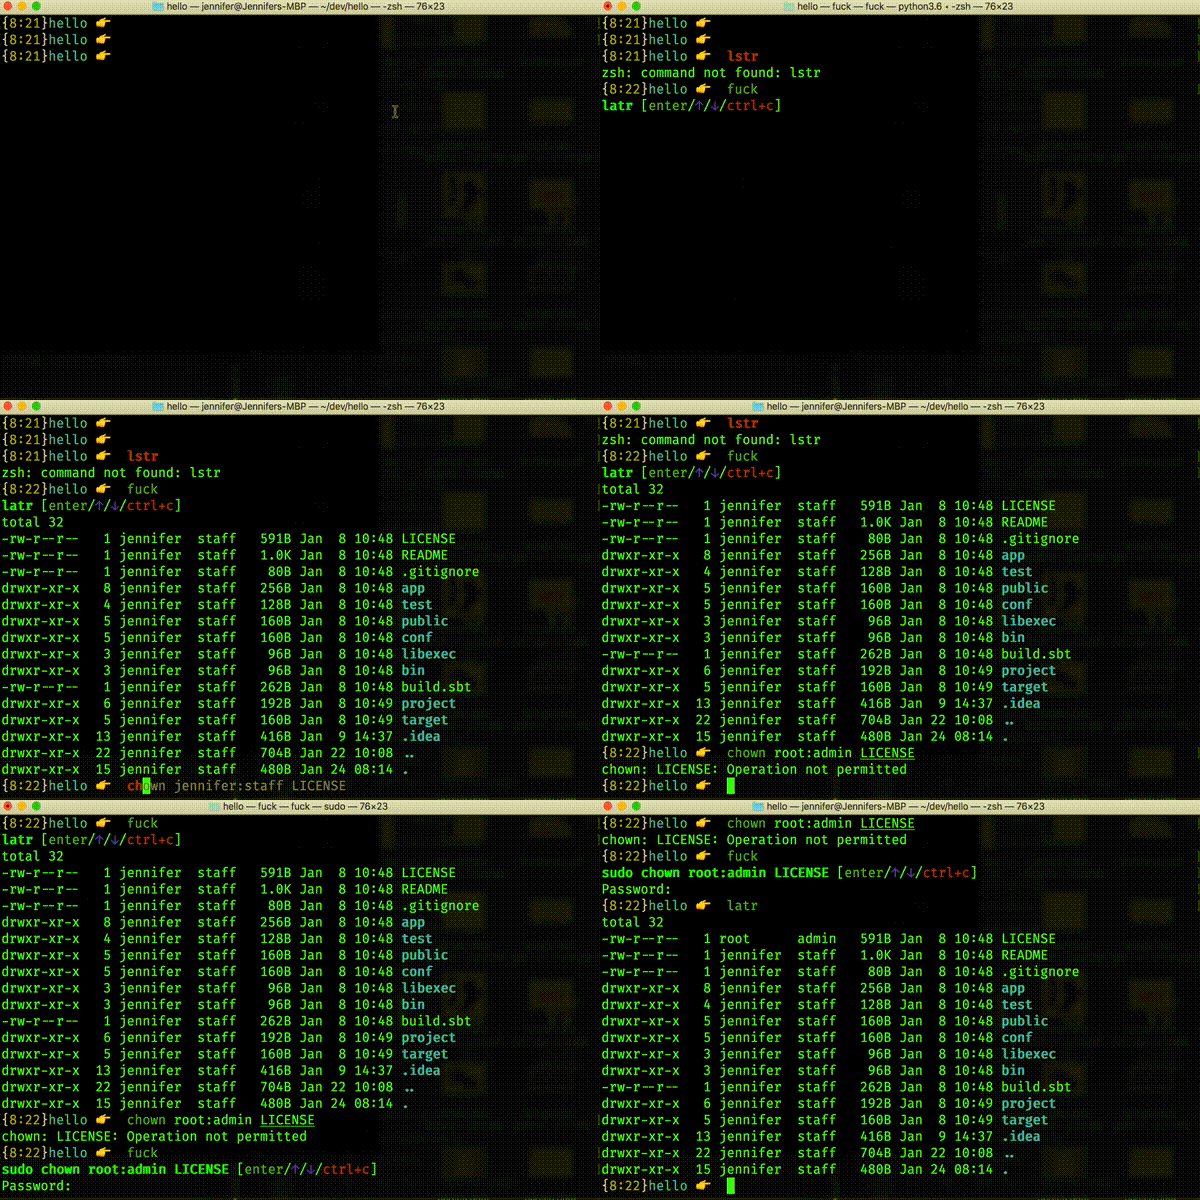
Everyone has days where they constantly mistype things and their muscle memory is failing them. Enter fuck. It's a CLI app that allows devs to type out what they are actually thinking to get the command that they actually want. If you mistype a command (like chiwn instead of chown), all you need to do is type fuck next and it will correct your command and then run it. Here's an example gif:

out.gif

Option and Either in Scala

I'm used to Ruby. In Ruby, you can use nil with abandon and just do something like if variable to check if it exists. Below is valid Ruby code (though forgive me if I'm now out of practice):

1
2
3
4
5
6
7
def displayUser(user)
  if user
    user.name
  else
    "No name"
  end
end

When I started on this project, I started treating Scala the same way. However, I found out that apparently you want to avoid using null in Scala. My first iteration prior to discovering this was the following:

1
2
3
4
5
6
7
def displayUser(user: User = null): String = {
  if(user != null) {
    return user.name
  } else {
    return "No name"
  }
}

This is not proper Scala. Unlike Ruby, Scala has Option. Option allows you to have Some or None. As you might expect, Some has a value, while None is the equivalent of null. Here's an example of how to do that same function properly:

 1
 2
 3
 4
 5
 6
 7
 8
 9
10
11
def displayUser(user: Option[User] = None): String = {
  if(user.isDefined) {
    return user.get.name
  } else {
    return "No name"
  }
}
// call it like this
user = User()
displayUser(Some[user]) //or
displayUser()

Either provides a similar function to Option but is better for returning error messages. The problem I was trying to solve was creating an organization user. For that to happen, there must be an organization and a user. Here's the initial way I did it, thinking as a rubyist:

 1
 2
 3
 4
 5
 6
 7
 8
 9
10
11
def validateUserAndOrgExist(email: String, orgId: Long): (Organization, User, Boolean, String) = {
  val user = usersService.findByEmail(email).head
  val organization = organizationsService.find(orgId).head
  if (user == null) {
    return (null, null, false, "User does not exist. Please create user first.")
  } else if (organization == null) {
    return (null, null, false, "Organization does not exist. Please create organization first.")
  } else {
    return (organization, user, true, "both exist")
  }
}

However, the better option (hehe) is to use Either in this case. So here's the better way to do this same function:

 1
 2
 3
 4
 5
 6
 7
 8
 9
10
11
12
13
14
15
16
17
18
19
20
21
22
trait ValidationError { val message: String}
case class IdentifierNotFound(message: String) extends ValidationError

def validateUserAndOrgExist(name: String, orgId: Long): Either[IdentifierNotFound, (Organization, User)] = {
  val user = usersService.findByEmail(name).headOption
  val organization = organizationsService.find(orgId).headOption
  if (user.isEmpty) {
    Left(IdentifierNotFound("User does not exist. Please create user first."))
  } else if (organization.isEmpty) {
    Left(IdentifierNotFound("Organization does not exist. Please create organization first."))
  } else {
    Right((organization.get, user.get))
  }
}
// then call it and use it like this:
val validationOfUserOrg = validateUserAndOrgExist("test", 123)
if(validationOfUserOrg.isRight){
  val (organization, user) = validationOfUserOrg.right.get
  print("User $user.name is in Organization $organization.id.")
} else {
  print(validationOfUserOrg.left.get.message)
}

And that's how you use Either and Option!

The TL;DR on tldr

There's a new package out that simplifies man pages and it's GREAT: tldr. Here's an example:

Screen Shot 2017-11-30 at 8.23.14 AM.png

tldr doesn't include every command, but it's growing with community support. Install it one of the following ways:

npm install -g tldr
brew install tldr
gem install tldrb
pip install tldr

There are many more ways to install, so if one of those doesn't work for you, go to the tldr github and find one that does.

Asking Questions

I've been thinking about this for a while, but keep not actually writing this post. One of the biggest mistakes I see juniors make is not to ask questions when needed for fear of looking like they don't know what they are doing. Granted, part of that is the way senior developers often react to questions. April Wensel wrote a fantastic article last August about the toxic tone that is prevalent in tech. So two points here:

  1. Senior devs should all read that article and consider more carefully how they talk to junior devs (or any other person for that matter). I'm not picking on anyone - I have definitely been guilty of this as well. However, being able to explain concepts plainly and empathetically shows your knowledge more than making someone feel dumb because they don't also have that knowledge.
  2. Junior devs need to make sure to timebox themselves. Give yourself a chance to do some googling, see if you can find an answer to your question on your own. However, after that first 30 minutes/hour, you should bring your question to someone else. Ideally, you have someone that you can approach who will answer your question compassionately. Make sure you give them all the information you have and the attempts you have already made. This will help avoid feeling like you are getting repetitive information.

SQL is the best!

I gave a SQL tutorial at PyLadies Boston last night and it was pretty fun. We used sqlite3 (which is definitely my least favorite DBMS, but it does come installed on pretty much every Linux/Unix machine by default and is the default for Django so I decided it was the best tool for this particular job. Giving a tutorial on something I used daily and have used consistently for 7 years was a bit weird because I did forget a few things because it didn't even cross my mind that people wouldn't know. For example: I initially neglected to mention that every statement needs a semicolon at the end and that you can't mix quotes (no " with '). Consider that was the bulk of all the issues, I'm feeling pretty successful right now! Take a look at the full tutorial below and let me know what you think.

Plotting Data From A CSV with Matplotlib

After I got all that data from the logs, my boss wanted it in a nice graph. First of the active user numbers, then the top 15 users. I knew that, despite having never used Matplotlib, it will still take me less time to learn it than any of my other options. I was able to get my script running and plotting correctly in less than two hours, so I felt pretty good about that. However, I had a few nested for loops and I wasn't a big fan. Enter the crowd-sourced code review! My friend Jenny was able to come up with a cool alternative to my solution that I ended up using. She utilized plot_date to sort the dates/data, which really helped (I was doing all sorts of crazy fun things).

So here's an example of what active_users.csv looked like:

system,au1,au30,date
jira,5,20,2016-06-09
confluence,16,23,2016-06-09
jira,8,22,2016-06-10
confluence,18,26,2016-06-10
jira,10,22,2016-06-11
confluence,18,26,2016-06-11
jira,11,23,2016-06-12
confluence,19,27,2016-06-12
jira,13,24,2016-06-13
confluence,19,28,2016-06-13
jira,8,24,2016-06-14
confluence,10,28,2016-06-14
jira,9,26,2016-06-15
confluence,15,30,2016-06-15
jira,15,26,2016-06-16
confluence,20,30,2016-06-16

he biggest problem was determining how to store the data in the program in a way that could be easily plotted. End solution? A dictionary of arrays. Or more precisely, a dictionary of a dictionary of arrays. With each line, we appended each data point to the matching array, which meant that a given date had the same index as it's data. And boom! It works!

import matplotlib.pyplot as plt
import csv
from datetime import datetime

active_users = {
  'jira': {
    'dates': [],
    'au1': [],
    'au30': []
  },
  'confluence': {
    'dates': [],
    'au1': [],
    'au30': []
  }
}

with open('active_users.csv') as csvfile:
  active_users_csv = csv.reader(csvfile)
  for system, au1, au30, date in active_users_csv:
    active_users[system]['dates'].append(datetime.strptime(date, '%Y-%m-%d'))
    active_users[system]['au1'].append(au1)
    active_users[system]['au30'].append(au30)

plt.plot_date(active_users['jira']['dates'], active_users['jira']['au1'], label='jira au1', color='orange', fmt='-')
plt.plot_date(active_users['jira']['dates'], active_users['jira']['au30'], label='jira au30', color='red', fmt='-')
plt.plot_date(active_users['confluence']['dates'], active_users['confluence']['au1'], label='confluence au1', color='green', fmt='-')
plt.plot_date(active_users['confluence']['dates'], active_users['confluence']['au30'], label='confluence au30', color='blue', fmt='-')
plt.legend(bbox_to_anchor=(0., 1.02, 1., .102), loc=3,
           ncol=4, borderaxespad=0.)
plt.show()
Resulting graph of AU1 and AU30 numbers

Resulting graph of AU1 and AU30 numbers

Ok, so now that graph #1 is done, I had to graph the top 15 users over the past week and their usage patterns. First off, here's an example of the data I was working with:

User,Date,Request Count
jsmith,2016-06-20,12
kthrace,2016-06-20,1
shastings,2016-06-20,11
sbristow,2016-06-20,3
jmccoy,2016-06-20,3
akoni,2016-06-20,9
gmorrison,2016-06-20,4
pfisher,2016-06-20,18
ndrake,2016-06-20,10
lbriscoe,2016-06-20,7
egreen,2016-06-20,13
crubirosa,2016-06-20,20
avanburen,2016-06-20,2
mlogan,2016-06-20,18
ckincaid,2016-06-20,11
rcurtis,2016-06-20,21
jfontana,2016-06-20,16
clupo,2016-06-20,5
kbernard,2016-06-20,7

Obviously, with our actual prod data, there were thousands of users... so a few more lines to loop through. The first problem was to put the data into a format I could use. Since even a top user might not use the system at all one day (say a Sunday), I couldn't use a simple dictionary; this time I had to utilize defaultdict. Defaultdict enabled me to create a dictionary of users where the value was (by default) an array of 7 zeros (representing usage for the past 7 days). After that, I was able to loop through the file for each day. To get the file names, I had to start with yesterday's date and go backwards. The date still gets appended to the 'dates' array, but the big change is in users: instead of appending the data to an array, I insert it into the index that matches that day.

So now that I have a dictionary of dates and users, I have all that I need to determine the top 15 users of the week. I create another dictionary that has the users as keys and sums up their total requests from the array and sets that as the value. Once I do that, I sort it, end up with a tuple, reverse it, then slice off the top 15. At that point, I just need to loop through my weekly_active_users list and then plot each user's data! Though I did have one, final (much smaller) problem: I had to find 15 matplotlib colors that I could use and distinguish. I created my array of colors and added a counter to each loop so I could add a unique color to each user. Success!

import matplotlib.pyplot as plt
import csv
from datetime import datetime, timedelta, date
from collections import defaultdict
import operator
from itertools import islice
import re

active_users = {
  'jira': {
    'dates': [],
    'users': defaultdict(lambda: [0] * 7)
  },
  'confluence': {
    'dates': [],
    'users': defaultdict(lambda: [0] * 7)
  }
}

active_users_weekly = {
  'jira': {},
  'confluence': {}
}
current_date = date.today()
day = timedelta(days=1)

for i in range(0,7):
  current_date = current_date - day
  current_date_txt = current_date.strftime('%Y-%m-%d')
  for system in ['jira', 'confluence']:
    active_users[system]['dates'].append(current_date)
    with open("active_users_{0}_{1}.csv".format(system,current_date_txt)) as csvfile:
      users = csv.reader(csvfile)
      for user, log_date, request_count in users:
        active_users[system]['users'][user][i] = int(request_count)

sorted_active = {'jira': {}, 'confluence': {}}
for system in ['jira', 'confluence']:
  for user, request_list in active_users[system]['users'].items():
    active_users_weekly[system][user] = sum(request_list)
  sorted_active[system] = sorted(active_users_weekly[system].items(), key=operator.itemgetter(1))
  sorted_active[system].reverse()
  sorted_active[system] = list(islice(sorted_active[system],15))

fig = plt.figure()
jira = fig.add_subplot(211)
jira.set_title('JIRA')
conf = fig.add_subplot(212)
conf.set_title('Confluence')
colors = ['red', 'gold', 'darkorange', 'green', 'turquoise', 'dodgerblue', 'navy', 'darkviolet', 'violet', 'pink', 'darkslategrey', 'silver', 'blue', 'lime', 'orange']

i = 0
for user, request_num in sorted_active['jira']:
  jira.plot_date(active_users['jira']['dates'], active_users['jira']['users'][user], label=user, fmt='-', color=colors[i])
  i += 1

i = 0
for user, request_num in sorted_active['confluence']:
  conf.plot_date(active_users['confluence']['dates'], active_users['confluence']['users'][user], label=user, fmt='-', color=colors[i])
  i += 1

jira.legend(bbox_to_anchor=(0., 1.1, 1., .102), loc='lower center',
           ncol=8, borderaxespad=0.)
conf.legend(loc='upper center', bbox_to_anchor=(0.5,-0.1), ncol=8)
plt.show()
Oooh pretty colors! Also, fake data makes for a bad graph.

Oooh pretty colors! Also, fake data makes for a bad graph.

A Quick Post About Resumes

PyLadies Boston recently had a mock interview night and with that I offered to review resumes. I got a few takers, did some reviews, and now I have some thoughts.

  1. If you are randomly switching fonts, please have a good reason for it. It is distracting (in a bad way) if you go from a serif to a sans serif for seemingly no reason.
  2. If you are writing your job duties as a bullet-point list, please make sure each point is connected to itself. I can't seem to think of a great way to say that, but let me give an example. If one of your points is: Improved test coverage by 10%, organized tech talks, and implemented a code quality standard - then those should really be elaborated upon if possibly and definitely split into three separate points.
  3. Make sure your resume reflects the skills of the job you are looking for. That doesn't mean that, if you have been a research scientist that now wants to be a full-time programmer, you have to ignore your past history. However, you do have to highlight different things. For example, how did you analyze a set of data? Did you use Python? What libraries did you use?
  4. Along the same lines: If you are applying for your first programming job and don't have any related experience, you really need a projects section that lists the programming projects you have worked on and any open source you have done, along with descriptions. You know you can do the job, but if you don't put proof that you can code, the internal recruiter/HR person is going to throw your resume out.
  5. For skills section: if you are including it, please make sure they are relevant! If you are applying for programming jobs, you do not need to include photoshop. Also, definitely do not include the Office Suite... familiarity with Office or similar software is assumed if you know how to use a computer (which is also assumed if you are applying for programming jobs).
  6. White space is your friend! Definitely don't jam everything together. Separating out sections, careful use of bold fonts and color, and horizontal lines can really help draw the reader's attention to wherever you want it to go.

Sorry some of those were a bit of a ramble, but these are all things I have seen recently on resumes. A resume is often the first look that many people have into your professional life, so you want it to represent you in the best way possible. If you have any questions, feel free to comment!

Calculating Age... in Java 8

I'm doing a bit more Java now that I'm taking a Java class. With that is coming a lot of "oh that should be easy... wait, there's not a really simple way to accomplish this???". First example of this: determining someone's age.

import java.time.LocalDate;

public class Age {
  private int birthYear, birthMonth, birthDay, age;

  public Age(int birthYear, int birthMonth, int birthDay){
    this.birthYear = birthYear;
    this.birthMonth = birthMonth;
    this.birthDay = birthDay;
    this.age = getAge(birthYear, birthMonth, birthDay);
  }

  public int getAge(int birthYear, int birthMonth, int birthDay){
    LocalDate fullBirthday = LocalDate.of(birthYear, birthMonth, birthDay);
    LocalDate now = LocalDate.now();
    long daysSinceBirth = now.toEpochDay() - fullBirthday.toEpochDay();
    return (int) (daysSinceBirth/365);
  }
}

LocalDate is new to Java 8. Previously it was part of the Joda-Time API, but the Java folks seem to have added the bulk of the functionality directly into Java. Sweet! What does this allow us to do? LocalDate creates an object that represents a date and has quite a verbose API. Since we're calculating someone's age, we are going to need an object that represents their birthday and an object that represents today (in this case fullBirthday and now). If we convert these both to Epoch Days, which is generally just the number of days from 1970-01-01, we can just compare the number of days and divide by 365 to get the age. Not too hard... but did take a second to come up with it... I was a bit surprised that it seemed like I couldn't actually subtract dates. Ruby has spoiled me...

Update: In the comments below, Ted Vinke alerted me to another, even easier way to calculated it with the Period. This solution still uses LocalDate, but takes less math on our part. Thanks for the improvement, Ted!

import java.time.Period;
import java.time.LocalDate;

public class Age {
  public int getAge(int birthYear, int birthMonth, int birthDay){
    LocalDate fullBirthday = LocalDate.of(birthYear, birthMonth, birthDay);
    LocalDate now = LocalDate.now();
    int period = Period.between(fullBirthday, now).getYears();
    return period;
  }
}

Polymorphic Routes

I just started classes (working toward the CS certificate at BU Met) and my new big project at work is porting over a ton of code from Rails 2 to Rails 4, so I’m sure I’m about to have tons to write about. For today, here’s something I somehow just found out about: polymorphic routes in Rails.

What are polymorphic routes? Let’s say you want to have a partial that is used for quite a few different models. Every model you have has a show page for individual instances of that model and each show page has an edit link. So instead of creating a new page for each, the view you have reads in a generic @object and then you can use polymorphic routes to generate the path for the edit link! In this example, I’ll have the @object represent an instance of the Article class. Like so:

edit_polymorphic_path(@object)

results in:

edit_article_path(@object)

I’m pretty surprised I haven’t seen this yet, but now I’m glad that I have! This is pretty cool :D

#ReplaceCodeSchoolsWithCommunity2016

My friend Pamela had some thoughts on code schools that she shared on Twitter today and I just have to echo them in every venue that I have. Code schools have long made me feel uncomfortable. It really started when a local code school started amping up representation at RailsBridge (free & community driven), obviously with an aim to drive RailsBridge grads to their boot camp. Considering the other TAs were there from companies that were interested in hiring, I thought it really sleazy that they were just using it to try to recruit more students. Add this in to women generally needing more validation before they feel comfortable calling themselves developers and that makes me feel even more uncomfortable.

I try to do my part by running PyLadies Boston and Pamela runs Rails Girls Atlanta. Both of these groups exist to provide a community for women to learn to code, with no charge. I’ve actually had multiple women from my group start applying to jobs as developers and I know the same goes with Rails Girls. Community can make a big different and we need to let women know that you don’t have to shell out $$$ to become a developer. The community will help!

PS - I have met so many wonderful and smart grads of code schools. This is not a knock on you! It’s a knock on this f’ed up industry.

A Bash Script For When You Need To Duplicate Host Keys Across Servers

Why would you need to do this? Let’s say you have three production nodes: server1.test.com, server2.test.com, server3.test.com. In general, your production application (at prod.test.com) point to server1.test.com. But OH NO you totally messed something up on that node and you need to easily failover to server2.test.com. Easiest way? If they all have matching server host keys, you can just point prod.test.com to server2’s ip and you won’t get any errors. Otherwise, you’ll get loads. I also added a noop (no operation) mode to this script so it could be run as ./move_keys.sh -n and only print out the lines that it would run.

This script is written to be run on the server you want to copy the keys from as your user, which means you have to have ssh access into each server. For each server in the list that is not the host, it backs up the /etc/ssh directory, rsyncs the keys over, restarts ssh, then removes the relevant lines for that server in the known_hosts file.

#!/bin/bash
# use noop mode by passing -n
NOOP=false
# parse the options
while getopts 'n' opt ; do
  case $opt in
    n) NOOP=true ;;
  esac
done

SSHC='/usr/bin/ssh'
HOST=`hostname -f`

# Params: $1, host to log into and copy ssh dir into backup dir
copyit() {
  if [ $NOOP = true ]
  then
    echo "$SSHC -A $1 'sudo cp -r /etc/ssh /etc/ssh_bak_$(date +%Y%m%d%H%M)'"
  else
    $SSHC -A "$1" "sudo cp -r /etc/ssh /etc/ssh_bak_$(date +%Y%m%d%H%M)"
  fi
}

# Params: $1: src path, $2: dest path
moveit () {
  if [ $NOOP = true ]
  then
    echo "sudo -E rsync -avz -e 'ssh -o StrictHostKeyChecking=no' --rsync-path='sudo rsync' $1 $2"
  else
    sudo -E rsync -avz -e 'ssh -o StrictHostKeyChecking=no' --rsync-path='sudo rsync' $1 $2
  fi
}

# Params: $1, host to log into
restartit() {
  if [ $NOOP = true ]
  then
    echo "$SSHC -A $1 'sudo service ssh restart'"
  else
    $SSHC -A "$1" "sudo service ssh restart"
  fi
}

# Parmas: $1: host to deploy keys to
removeknown() {
  if [ $NOOP = true ]
  then
    echo "sudo ssh-keygen -f '/root/.ssh/known_hosts' -R $1"
    echo ""
  else
    sudo ssh-keygen -f "/root/.ssh/known_hosts" -R $1
  fi
}

# Params: $1: host to deploy keys to
movekeys () {
  copyit "$1"
  moveit "/etc/ssh/ssh_host_key" "$USER@$1:/etc/ssh/"
  moveit "/etc/ssh/ssh_host_key.pub" "$USER@$1:/etc/ssh/"
  restartit  "$USER@$1"
  removeknown "$1"
}


set -e

declare -a Servers
Servers[0]='server1.test.com'
Servers[1]='server2.test.com'
Servers[2]='server3.test.com'

Servers_minus_host=( ${Servers[@]/$HOST*/} )

for server in "${Servers_minus_host[@]}"
do
  movekeys $server
done

Sanitize Text in Perl

One of the projects I’m working on is in Perl. Having never touched Perl before, this is a bit of a new adventure! Today I had to sanitize a field being passed by a url. This took me a few google searches before I found the right answer, so I’m going to write down the solution really quick here so I don’t forget it.

Here’s the code:

# assuming $message is your user-inputed data
use HTML::Entities;
my $encoded_message = HTML::Entities::encode($message);

Then you can print your $encoded_message out in html and you will not be vulnerable to XSS attacks.

I literally just looked at Perl for the first time today, so any tips are welcome!

Job Search Retrospective

Wow what a month. I’ve been interviewing for a little over a month now. Two weeks ago, I quit my job (post on that mess coming up in a a few more months) and somehow got a job offer the same day. This has definitely been my shortest job search (time when I submitted my first application to first offer), so I wanted to share what I think has been different.

Finding Potential Employers - Recruiters & Networking

So first things first… I may run a fairly large meetup group, but I’m actually pretty bad at networking. If you are a networker and can go to a ton of meetups and talk to people, that’s the best way, hands down. First interview I got was because I went up to someone who I knew was hiring at a conference and talked to them.

If you aren’t much of a networker (like myself), working with recruiters is the way to go. If you are in one of the areas they serve, I have had really good luck with Talener, their Boston office in particular. They have put me in front of some great companies and I’ve had a ton of in person interviews as a result. 

Many people say that you don’t get anywhere from submitting your resume just from the company’s website. NOT THE CASE! I got my last job like that and, during this search, I got a great interview by doing that.

Now that the interviews are lined up…

Interviews!

The biggest change is obviously experience. Time definitely makes each round of interviews a bit easier! There were a few other things that made it a bit easier though. 

The first was inspired by Julie Pagano’s own job search retrospective. I’ve never been very good at asking a bunch of questions, but I looked at the questions she and Julia Evans asked and took a bunch of my favorites. I had a notebook and wrote out all the questions and all the answers. This helped immensely because, not only did I find out more about the companies and how they worked, but it also helped turn the tables a bit to have me interviewing them. 

The second was that I finally actually thought of a good answer for ‘Tell us about an interesting/challenging problem that you have solved and how you did it’. I was asked variations of that question at almost every interview and this is the first year I felt I had something to talk about. I was just talking to a junior dev about this question and, really, anyone who has solved any problem with code should have an answer to this question. If you have a project, you must have created it to solve a problem. If you had a bug in your project and fixed it, there’s your problem. Sure, it’s not the most interesting, but you will get better and better answers as you gain more experience, and employers recognize that.

And the one thing you cannot forget in tech interviews, WHITEBOARDING. Three years into this and whiteboarding is still nerve-wracking and I still feel like I’m awful at it. One thing I have learned: how the interviewers interact with you while whiteboarding tells you a lot how they would interact with you when actually problem solving on that job. If someone is making you feel stupid while whiteboarding, then you probably don’t want to work with that person. On the flip side, If you are having a bit of trouble and the person interviewing you is actually helpful, then that is the type of person that you want to work with.

Overview

Interviewing is tough. No matter what level you’re at, you’ll get people who will tell you don’t have enough experience for the job. Don’t sweat it. It just means it’s not a good fit… you’ll find a good fit somewhere else :D

Chosen & Multiselect

I’ve been doing a bit of work jazzing up our multiple select boxes. These plugins are going to be familiar to most people, but if you haven’t looked into both of these, you should. I had previously been using jQuery multiselect in my current app but have recently switched to Chosen to make use of it’s search functionality. Here are the two that I’m going to highlight:

1) Chosen

Chosen gives you the ability to do a type-ahead search. Instead of scrolling down through a long list, I can start typing and see what options match. Particularly helpful in dealing with food… if I don’t like almonds, it’s nice to see that almonds, almond milk, and almond flour could all potentially be ingredients.


2) jQuery multiselect

jQuery multiselect does require the scroll down list. You can use a separate plugin for search capabilities, but, by default, it doesn’t include it. However, if you have a shorter list, this is a very nice way to let the user select and deselect items.